From install to live radar
Everything a new DroneScan Pro user needs, in the order you need it - written for people who have never set up a drone receiver before.
DroneScan Pro listens for the Remote ID signal that drones broadcast over Bluetooth and Wi-Fi, and shows every aircraft it hears on a live map. This guide walks through everything: installing the app, reading the map for free, and - if you want the web radar at dronescan.pro - linking your phone to your account so the drones it detects also appear on the website in real time.
- 1. Install & first scan
- 2. What you get for free
- 3. Find your Device ID
- 4. Add the device to your account
- 5. Upgrade the plan
- 6. Generate the API key
- 7. Turn on Drone Radar in the app
- 8. Watch the live radar
- 9. Label, note & group drones
- 10. Settings reference
- 11. Troubleshooting
Install the app and run your first scan
No account and no payment are needed for this part. The app scans on its own and shows nearby drones on the map.
Install DroneScan Pro
Install the app on your phone from Google Play, then open it. On the first launch the app creates a private Device ID for your installation - you will need it later in Part 3.
- A phone with Bluetooth and Wi-Fi is required - that is how Remote ID is broadcast.
- Drones must be broadcasting Remote ID (ASTM F3411 / EN 4709-002). Older drones without Remote ID cannot be detected by any app.
Allow the permissions
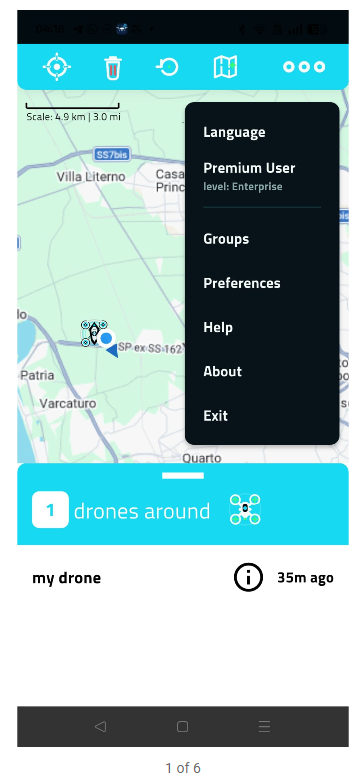
Open ••• › Preferences. The top of the page shows what the app is allowed to use. Everything under PERMISSIONS should have a green check:
- Bluetooth - receives Bluetooth 4 Legacy and Bluetooth 5 Extended Remote ID.
- Wi-Fi - receives Wi-Fi Beacon and Wi-Fi NaN Remote ID.
- Location - required by Android before any app is allowed to scan Bluetooth or Wi-Fi, and used to place you on the map.
- Notifications - needed for the alert when a new drone appears.
If something is red, tap Open app settings and enable it there. Under ENABLED TECHNOLOGIES you can also see which radio types your phone hardware supports - a red cross there means your phone cannot receive that type, which is normal on many devices.
Watch the map
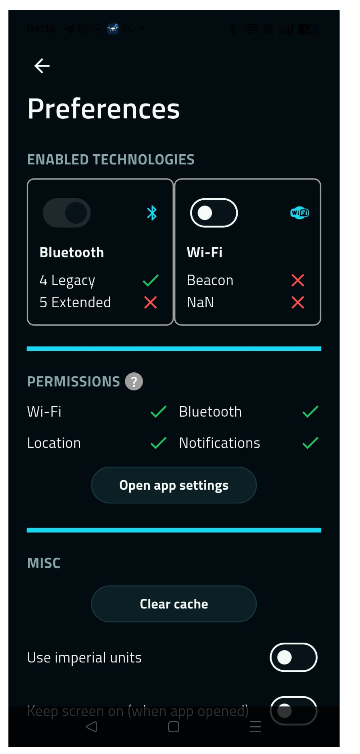
Go back to the map. Scanning starts automatically. When a drone broadcasts nearby it appears as an icon on the map and in the drones around list at the bottom. Tap a drone in the list to open its detail panel with serial number, type, altitude, speed and - when the drone broadcasts it - the operator position.
What you get for free, and what the paid plan adds
The app itself is free. A paid plan is only needed when you want the detections to leave your phone and appear on the dronescan.pro website.
| Feature | Free | Paid plan |
|---|---|---|
| Detect nearby drones on the phone map | Yes | Yes |
| Drone details (serial, type, altitude, speed, operator) | Yes | Yes |
| New drone notification on the phone | Yes | Yes |
| Multiple map layers and offline maps | — | Yes |
| Label drones, notes, drone groups | — | Yes |
| Stratux / ADS-B integration | — | Yes |
| Send detections to dronescan.pro (live web radar) | — | Yes |
| Web dashboard, flight history and replay | — | Yes |
| Email alerts for new drones | — | Yes |
Find your Device ID in the app
The Device ID is what links this phone to your dronescan.pro account. It is created automatically on the phone - you never choose it, you only copy it.
Open the plan screen
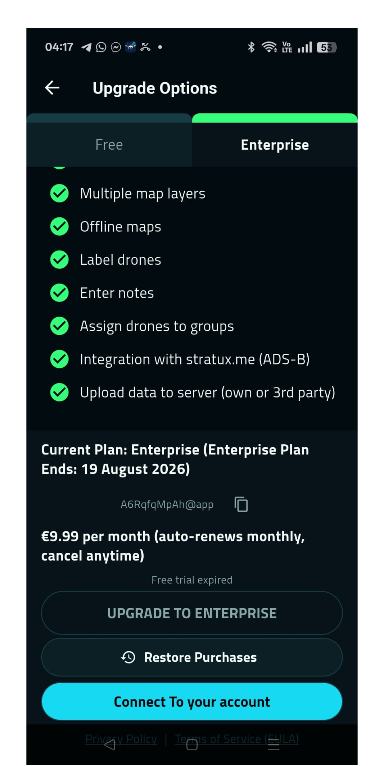
On the map, tap ••• at the top right, then tap Premium User (it reads Upgrade to premium while you are still on the free plan). The Upgrade Options screen opens.
Copy the ID
Scroll to the Current Plan block. Just under it there is a short code with a copy button next to it - that is your Device ID. Tap the copy icon.
- Android IDs start with
A, iOS IDs start withI, and they always end with@app. - Example:
A6RqfqMpAh@app - It is unique to this installation. Reinstalling the app on the same phone keeps it; a different phone gets a different ID.
Add the device to your dronescan.pro account
Now switch to a browser and open dronescan.pro.
Create your account
Register with your email address (or sign in with Google) and confirm the verification email. Without a verified email the portal pages stay locked.
Open App Installations
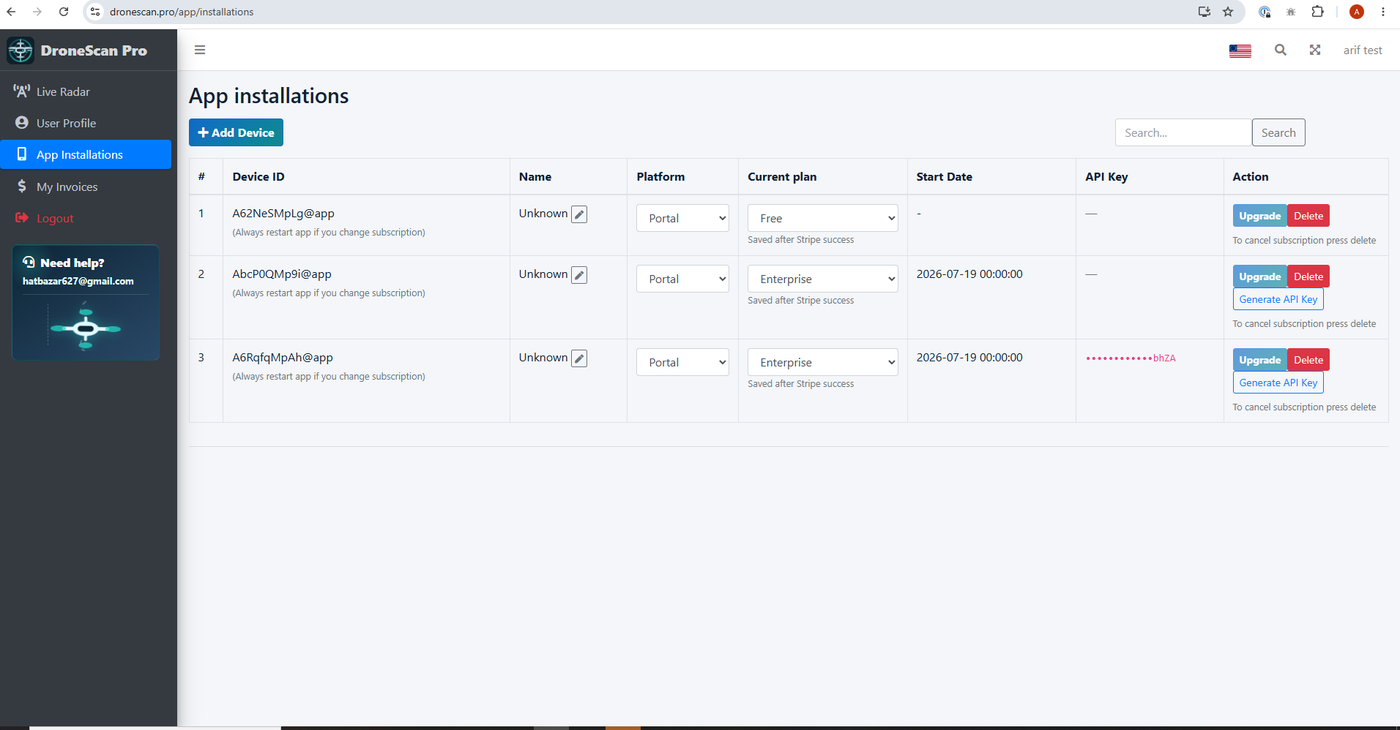
In the left sidebar choose App Installations. This page lists every phone and receiver linked to your account, with its plan, start date and API key.
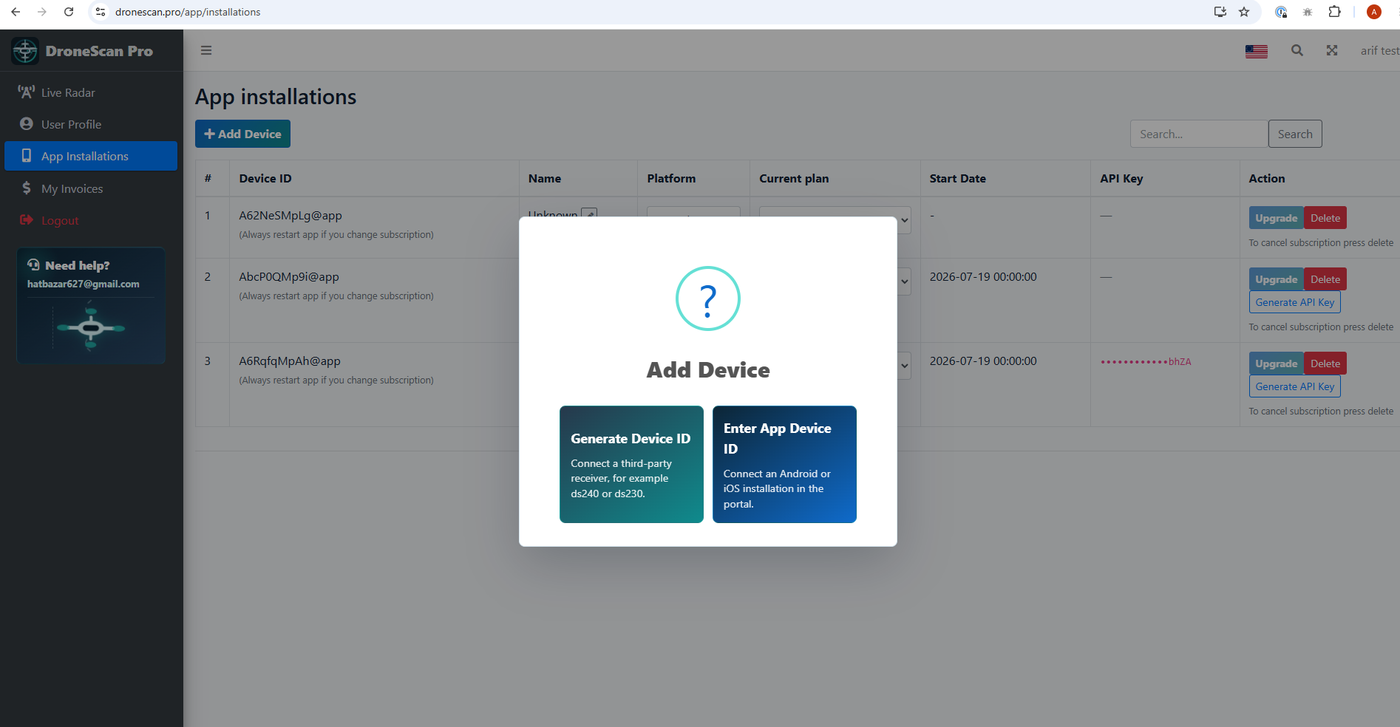
Click Add Device
A dialog offers two options - pick the one that matches your hardware:
- Enter App Device ID - for an Android or iOS phone running DroneScan Pro. This is the one you want: paste the ID you copied in Part 3.
- Generate Device ID - only for a stand-alone third-party receiver such as a ds230 or ds240. The portal creates the ID for you and the receiver is configured with it.
Set the Platform, then save. The new row appears in the table.
@app ending.
Put the device on a paid plan
Live radar only accepts data from a device on a paid plan, so this step comes before the API key.
You can pay in either place - the result is the same device on the same plan:
- On the website - press Upgrade on the device row in App Installations and complete the Stripe checkout. The Current plan column switches to Enterprise once the payment succeeds.
- In the app - open ••• › Premium User and use UPGRADE TO ENTERPRISE for a Google Play or App Store subscription. If you already paid on another device, use Restore Purchases, or Connect To your account to attach the phone to a plan bought on the website.
To cancel a subscription bought on the website, press Delete on the device row.
Generate the API key
The API key is the password the app uses when it sends detections to the website. There are two ways to create one - use whichever is easier for you. Both do the same thing, and each new key replaces the previous one.
From the website
In App Installations, press Generate API Key on the device row. The key is shown once - copy it immediately and type it into the app.
- The button only appears for a device on a paid plan.
- Afterwards the API Key column shows only the last 4 characters - the full key is never stored in readable form, so it cannot be shown again.
From the app (no copying)
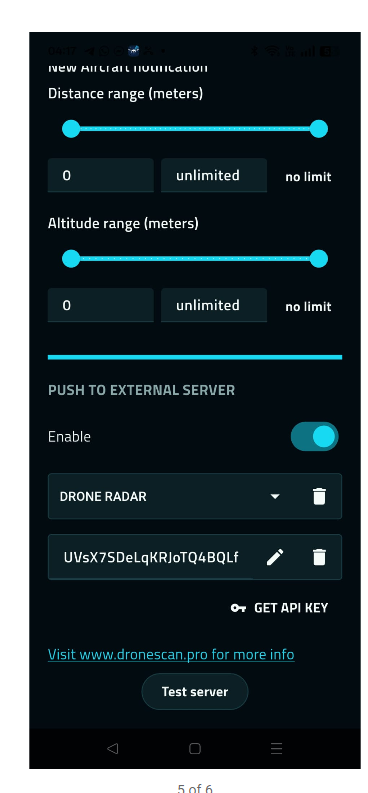
In the app open ••• › Preferences, scroll to PUSH TO EXTERNAL SERVER, choose the DRONE RADAR profile and press GET API KEY. The app asks the server for a key using its own Device ID and fills the field in for you.
Switch on Drone Radar sending
This is the step that actually starts the flow of data from the phone to the website.
Open ••• › Preferences and scroll down to PUSH TO EXTERNAL SERVER, then set it up in this order:
- Enable - turn the switch on.
- Profile - open the dropdown and pick DRONE RADAR. (The other entry, OWN SERVER, is for sending to your own endpoint instead of dronescan.pro.)
- API key - paste the key from Part 6 using the pencil icon, or press GET API KEY to fetch one automatically.
- Test server - press it. A success message means the key is valid and the website is reachable.
From this moment the app sends a status heartbeat every few seconds while it is open, plus every drone it detects. Your device shows as online on the website.
Watch your drones on the live radar
Everything is connected now. Open Live Radar in the sidebar.
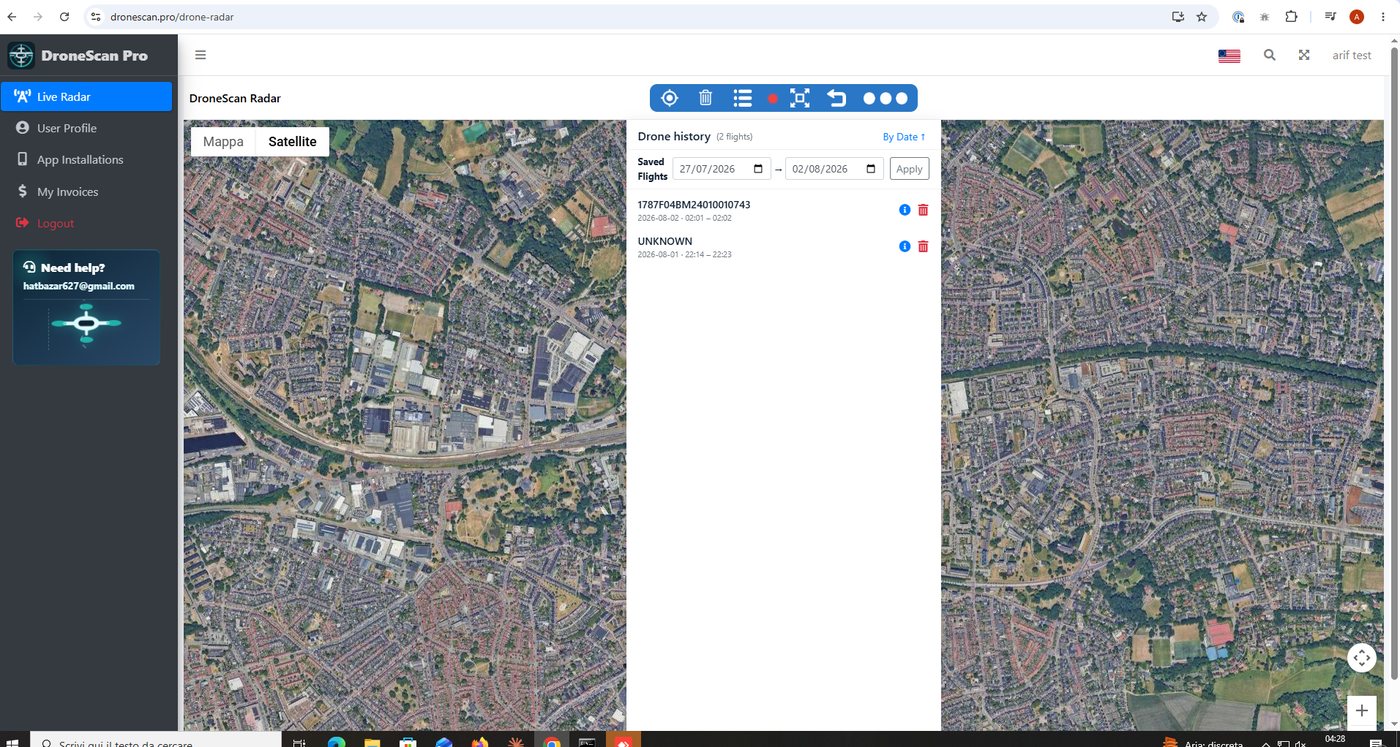
- Live map - every drone your phone is currently hearing appears here, with its track and, when broadcast, the pilot position. Switch between Mappa and Satellite at the top left.
- Drone history - the list on the right holds recent flights. Pick a date range and press Apply, then use the i button to inspect a flight or the bin to delete it.
- Toolbar, left to right - Center on me, Refresh map, History, the connection status dot, Fullscreen, Back (collapse the sidebar) and Settings (the three dots).
Reading a drone on the map
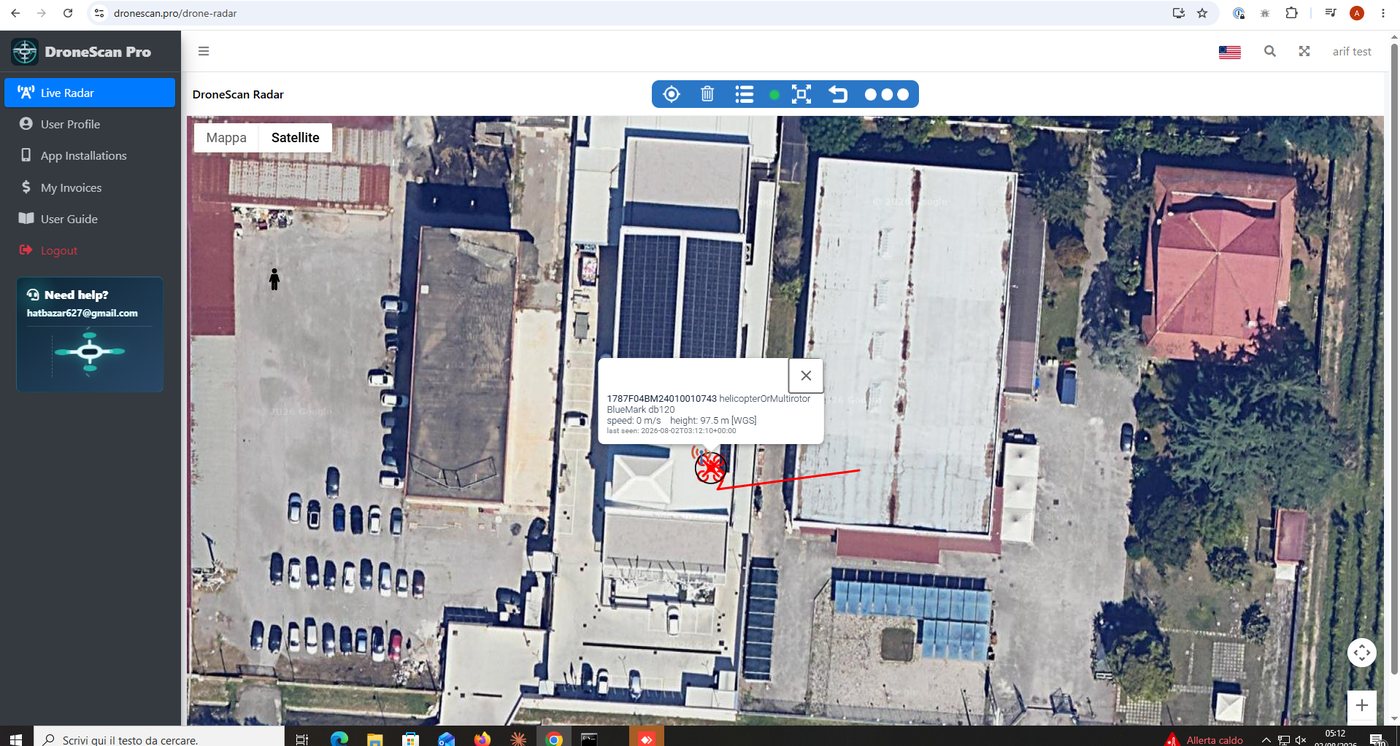
Click any aircraft marker to open its info bubble. It shows everything the drone is broadcasting right now:
- Serial number and type - for example
1787F04BM24010010743and helicopterOrMultirotor. - Manufacturer and model - shown when the serial can be matched, such as BlueMark db120.
- Speed in metres per second and height in metres above the WGS-84 ellipsoid - which is why it can differ from the height above the ground you see with your eyes.
- Last seen - the timestamp of the most recent message, in the time zone you set in Radar settings.
The straight red line from the aircraft points to the operator position, drawn only when the drone broadcasts it.
The same flight on the phone
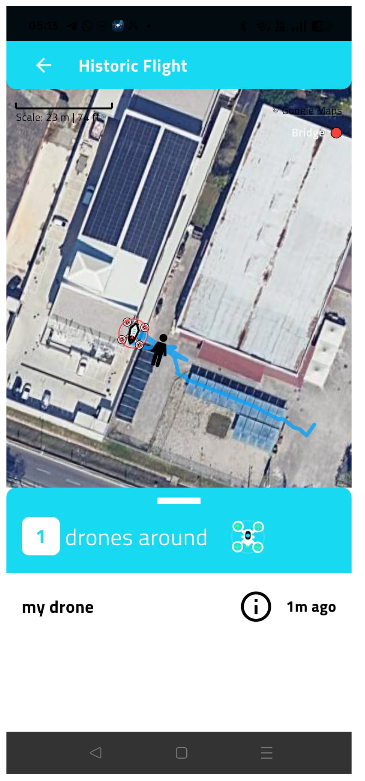
You do not have to be at a computer. In the app, tap the i button next to a drone in the drones around list to open Historic Flight: the track it has flown while you were receiving it, drawn over the map, with the operator position marked.
- The arrowed line is the flight path, oldest point first.
- The scale bar at the top left tells you how much ground the view covers.
- The bottom panel keeps the live list, so you can jump between aircraft.
Use the back arrow in the blue bar to return to the live map.
Label, note and group your drones
Once you monitor the same airspace regularly, the same serial numbers keep coming back. Labels, notes and groups turn those raw numbers into something you recognise at a glance. These are paid-plan features.
Notes - remember why a drone matters
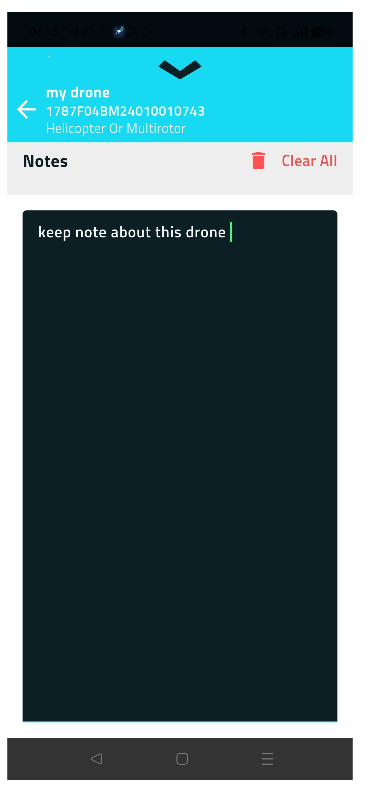
Open a drone from the drones around list, then use the note button in its detail header. The Notes screen opens with the drone name, its serial and its type in the blue bar so you always know which aircraft you are writing about.
- Type freely - the note is saved automatically as you write, there is no save button.
- The note is stored per drone on your phone and reappears the next time that serial is detected.
- Clear All (or the red bin) deletes the note after a confirmation.
Typical uses: "neighbour's drone, flies every evening", "survey contractor, authorised", "unknown - report if it returns".
Groups - one set of rules for many drones
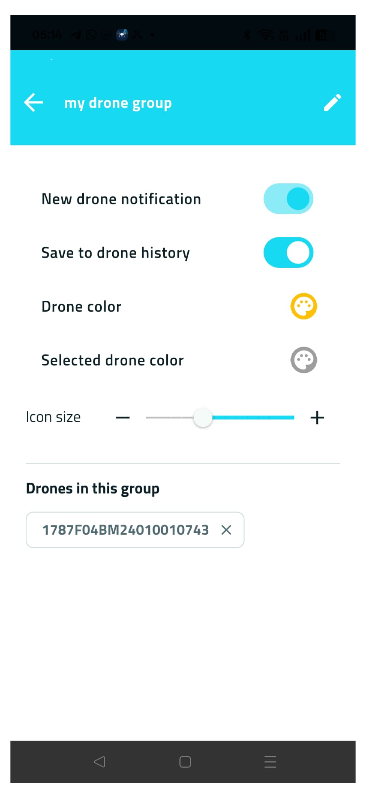
A group collects several serial numbers and gives them shared appearance and alert settings. Create one from a drone's detail header, or from ••• › Groups, then open it to configure:
- New drone notification - alert when a member of this group shows up.
- Save to drone history - keep this group's flights in history.
- Drone color and Selected drone color - the marker colour on the map normally, and while the drone is selected. Tap the palette to choose.
- Icon size - the slider (or the − and + buttons) scales the markers; the map updates as you drag.
- Drones in this group - every member serial as a chip. Tap the × on a chip to remove that drone from the group.
The pencil in the blue bar renames the group; existing members and settings follow the new name.
Settings you will want to know about
Two settings pages matter: Radar settings on the website and Preferences in the app.
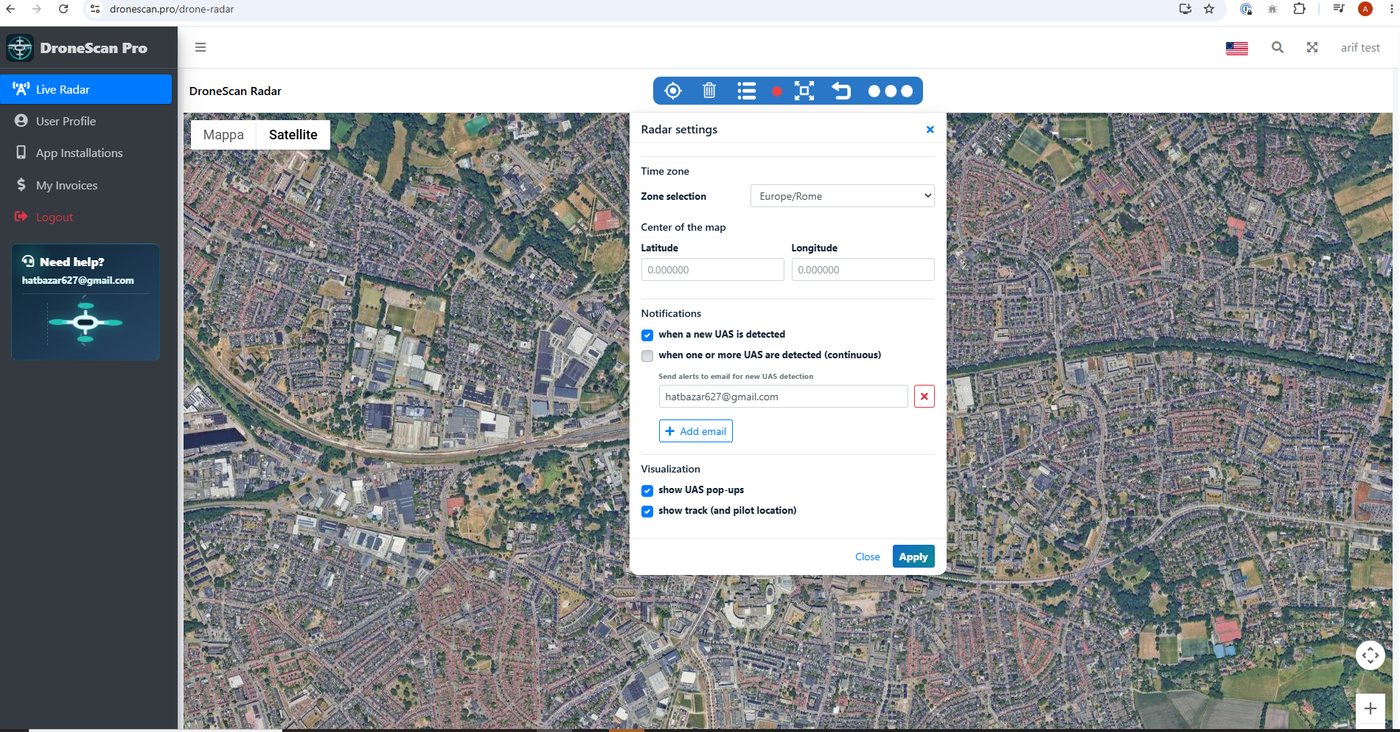
Radar settings (website)
Open them from the ••• button in the radar toolbar.
- Time zone - the zone every timestamp in history is displayed in.
- Center of the map - the latitude and longitude the radar opens at. Leave at 0 to follow the incoming data.
- Notifications - email alerts when a new UAS is detected, or continuously while any drone is up. Add as many recipient addresses as you need.
- Visualization - show the pop-up label on each aircraft, and show the flight track plus pilot location.
Press Apply to save.
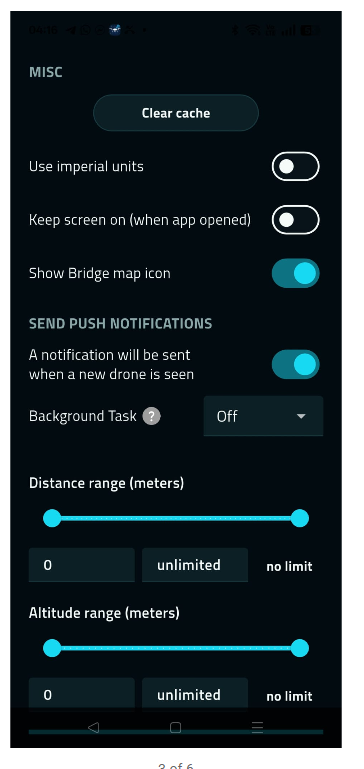
Preferences (app)
- Clear cache - drops stored map tiles and cached detections.
- Use imperial units - feet and miles instead of metres and kilometres.
- Keep screen on (when app opened) - stops the phone sleeping while you monitor.
- Show Bridge map icon - shows the Stratux / ADS-B bridge status on the map.
- SEND PUSH NOTIFICATIONS - phone notification when a new drone is seen.
- Background Task - keeps scanning and reporting while the app is in the background. Leave it Off to save battery, set an interval if you want unattended monitoring.
- Distance range / Altitude range - only notify for drones inside these ranges. Both default to no limit.
Troubleshooting
Almost every "it does not work" case is one of the five below.
The app sees drones, but the website radar stays empty
Walk down this list in order:
1. Is the device on a paid plan in App Installations? Free devices are not accepted by the radar.
2. Did you restart the app after the plan changed?
3. In Preferences, is Enable on and the profile set to DRONE RADAR (not OWN SERVER)?
4. Does Test server succeed? If it fails, the API key is wrong or expired - press GET API KEY to issue a fresh one.
5. Did you press Generate API Key on the website after setting up the app? That invalidates the key the app is still using.
Test server fails or the radar stops accepting data
The most common cause is two keys in circulation. Only the most recently generated key works. Issue one fresh key and make sure the app holds that one - the simplest way is GET API KEY inside the app, because it writes the new key straight into the field.
The portal will not accept my Device ID
Copy it with the copy button on the Upgrade Options screen rather than typing it.
It must keep the @app ending and match the app exactly. A device ID
can belong to only one account at a time.
No drones at all, even on the phone
Check the permissions in Part 1, confirm Bluetooth and Wi-Fi are switched on, and remember that only drones that actually broadcast Remote ID can be received. Some phones do not support Bluetooth 5 Extended or Wi-Fi NaN at all - the ENABLED TECHNOLOGIES box shows what yours can do.
The status dot on the radar is red or grey
Grey means no heartbeat has arrived yet - open the app and make sure the DRONE RADAR profile is enabled. Red means the heartbeat was arriving and then stopped: the app was closed or lost network, the phone went to sleep without a background task, or the API key was replaced. Green is the state you want.
Reporting stops when I lock the phone
Set Background Task in Preferences to an interval, and exclude DroneScan Pro from your phone's battery optimisation. Android aggressively suspends the radios of sleeping apps.
How the data actually travels
Still stuck? Contact us at hatbazar627@gmail.com and include your Device ID (never your API key). See also the Privacy Policy and Terms.